Showing posts with label mac review. Show all posts

Tuesday, 4 June 2013

Beauty and The Beach 2 - Travel Supermarket

I did enter the Travel Supermarket Beauty and The Beach competition last year but I literally only had 1 hour to do everything I wanted as Laalaa (who won btw . . . I actually cried out of happiness for her) only told me about it the night before it was meant to end.

This year Travel Supermarket are holding Beauty and The Beach 2 and I'm doing a triple whammy and entering both the hair, nails and beauty competition and going for a Bronzed, Caribbean holiday feel . . . yh this is my way for saying that this is going to be a very long post and I apologise now if my gif's take a while to load up BUT trust me you will want to wait a few extra minutes for everything to load up because my entry is just that good (in my opinion anyway lol).

Since I had a bit more time to play around with my beauty look this time, I've decided to keep it very simple as I don't really wear much makeup on holiday, I'm way too busy adjusting to the heat but  I have to admit that the Beyonce x HM ad inspired me a bit but honestly
My focus for my Beauty & The Beach entry is something simple enough to do that doesn't take up a lot of suitcase space and you don't need to buy a electrical socket adaptor if you wanted to recreate it on holiday. Now enough talking let's get started with the nails!!

Simple right? Well I did say that Nails were not my strong point butI can't lie, I'm please with how this turned out . . .I'm even more surprised that I managed to do this without smudging a nail halfway through.


With my eyes, I just keep repeating bronze, simple, bronze and simple in my head so after applying Urban Decay's Primer Potion all over my lids as a base, I popped on Rimmel's Scandaleyes Eyeshadow Stick in 003 Bad Girl Bronze and blended this all over my lid. Easy Peesy Right?? 

With cream eyeshadows blending is always key. To ensure that my cream eyeshadow is blended out properly and I don't have any harsh lines, I sweep MAC Antique over my crease bone, add MAC Wedge to my browbone and blend in MAC Texture over everything to get a smooth transition between all the shades.


To finish off my eyes, a combination of L'oreal Paris SuperLiner in Perfect SlimBlack Vinyl and Eylure False Lashes in 117 gives me a simple bronzed eye.
I really wanted to do a daytime beach look, something that's easy to put together and light, so you don't feel like you are melting under so many layers. With that said I'm concentrating on light to medium coverage with a sweet, pink finish so I look like I've just been to the beach . . . . or at least benefiting from my hotel's air-conditioning.

I'm using my NARS Sheer Glow and my MAC Select Cover up concealer for a lovely, sunkissed glow. A light dusting of MAC Prep & Prime Finishing Powder under the my eyes will stop my concealer from slipping during the day (and also stop sunglasses from making my concealer smudge).

Now on to my favourite part, Blush time!!! I first applyg my favourite Cream Blush in Betray from Illamasqua on my cheeks and set it with a bit a light setting powder (MAC MSF in Dark Deep). A pink highlight on my cheeks (MAC Stereo Rose) ensures that I don't lose the healthy, dewy glow that I'm after. Now all that's left is a pink, nude combo aka MAC Spice lipglass and MAC Lickable Cremesheen Lipstick and FINISHEDDD!!!!!!


As this post is already running a bit long (apologies), I'm going to whizz past my hair entry. I didn't really want to do much to my hair . . . ok I didn't want to tackle the 'fro, so summer beach accessories was the next logical step. You can get everything used in this tutorial from Boots, a florist/Wilkinsons, Sallys or your local Afro Beauty shop so it's super easy to do.
To get that beach look, Run to your local florist or Homeware store (aka Wilkinsons) and grab some flowers. You can use fresh flowers or fabric flowers for this look, it just depends on what you have on hand. Taking a pair of scissors snip . . or pull the flower off it's stem but be careful not too remove the base holding the flower together. Now get a few hair pins and push the hair pin through base off the flower.

As I want to keep my hair low key, I'm going to do a remix of the standard salt spray - beach waves hair. I mix water and a little bit of conditioner in a spray bottle (shake well), spritz my hair in sections and comb out any knots and tangles. Rather than using a salt spray on my hair, I'm going to take Beautiful Textures Curl Control Defining Pudding and run this through my hair to get some loosely define curls

All thats left to do now is scrunch my hair from tip to root . . .  and slide in the flower pins you made earlier
I would love to see an entry from Adrienne (The Sunday Girl), Laalaa (Dolce Vanity) ((Yes, again!!!) Catrine (Unnakednails), Laura (Laura Louise Beauty) and Jayne (Jayne's Kitschen) as I know they would just blow my entry away to pierces if they entered. I hope you love this look and gif-torials. The Deadline for the Beauty and The Beach 2 competition is June 5th 2013 (Wednesday) and if you feel inspired to enter the competition, make sure you tag me because I want to see it!!!
continue reading "Beauty and The Beach 2 - Travel Supermarket"

Wednesday, 15 May 2013

How To:- Set Undereye Concealer

I really wasn't planning on doing this post and did have something else planned for today but after seeing someone on the train with heavily caked under-eyes yesterday, I got struck with the lightening bolt of inspiration and decided to pull this post together.

I love how Youtube has inspired a lot of people to dabble in makeup; which FYI I think is amazing, but a common problem seems to be that a whole lot of people only follow the steps halfway through or don't understand why certain products used rather than others and end up making major mistakes like setting your undereye concealer with Compact face powder instead of a translucent powder. Not every powder is the same!!!!

As I've recently bought a new transclucent powder from Daniel Sandler for £7 and FYI loving how finely milled it is compared to my Ben Nye Powder in Sienna. I thought a tutorial was in order.
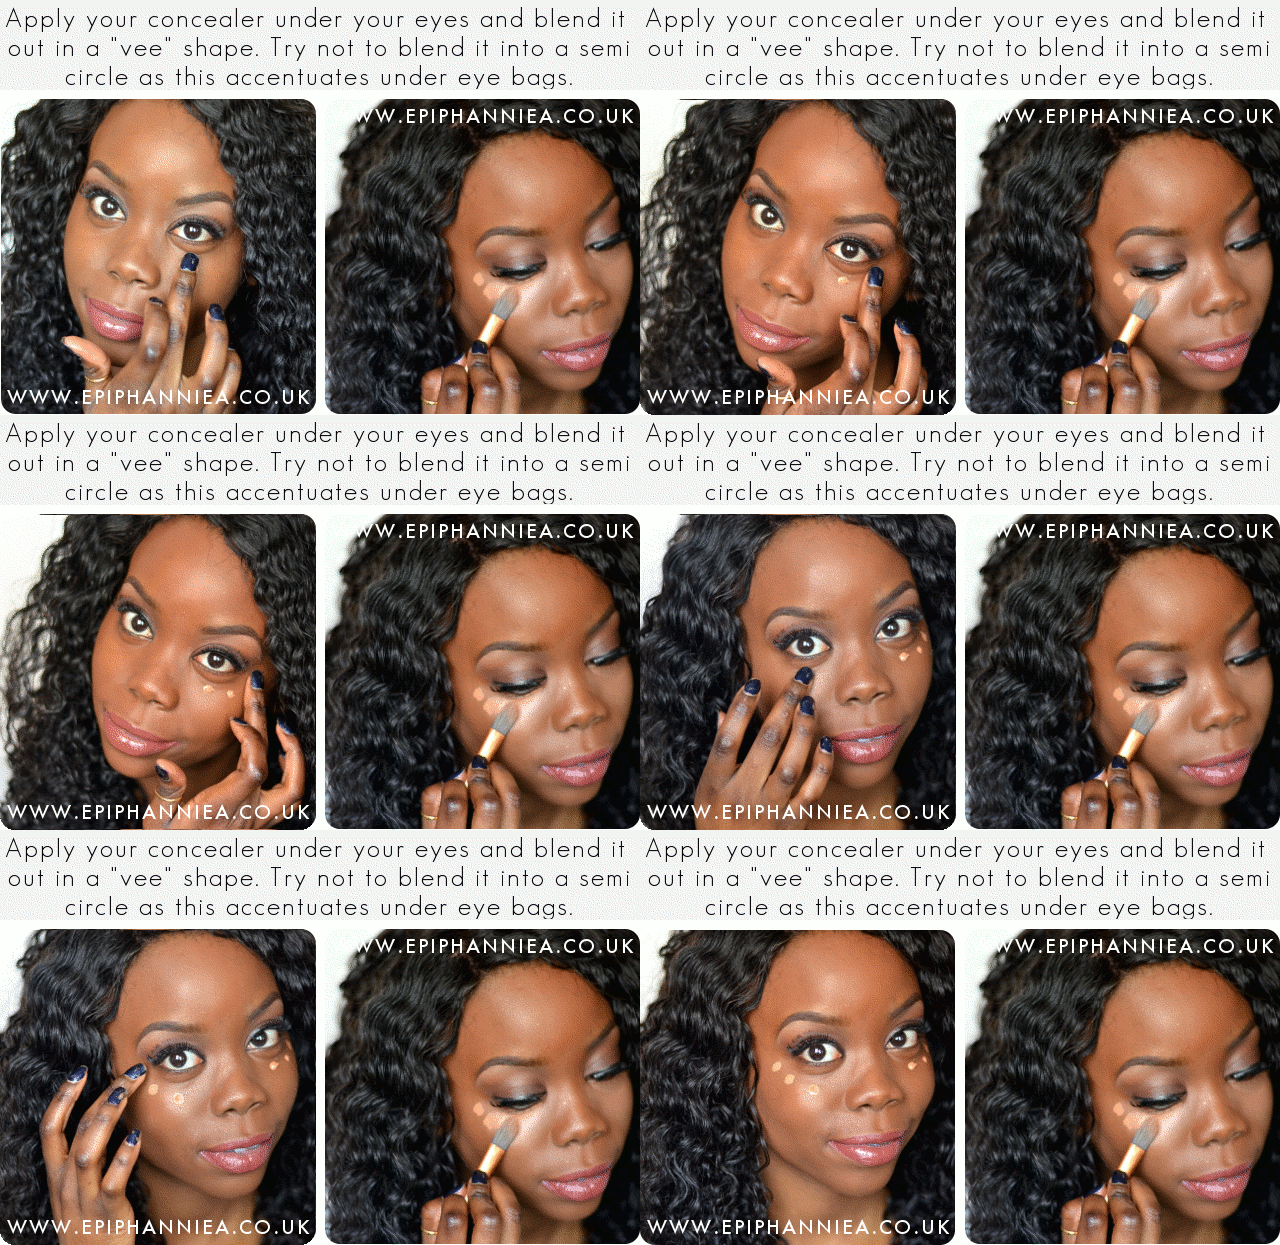
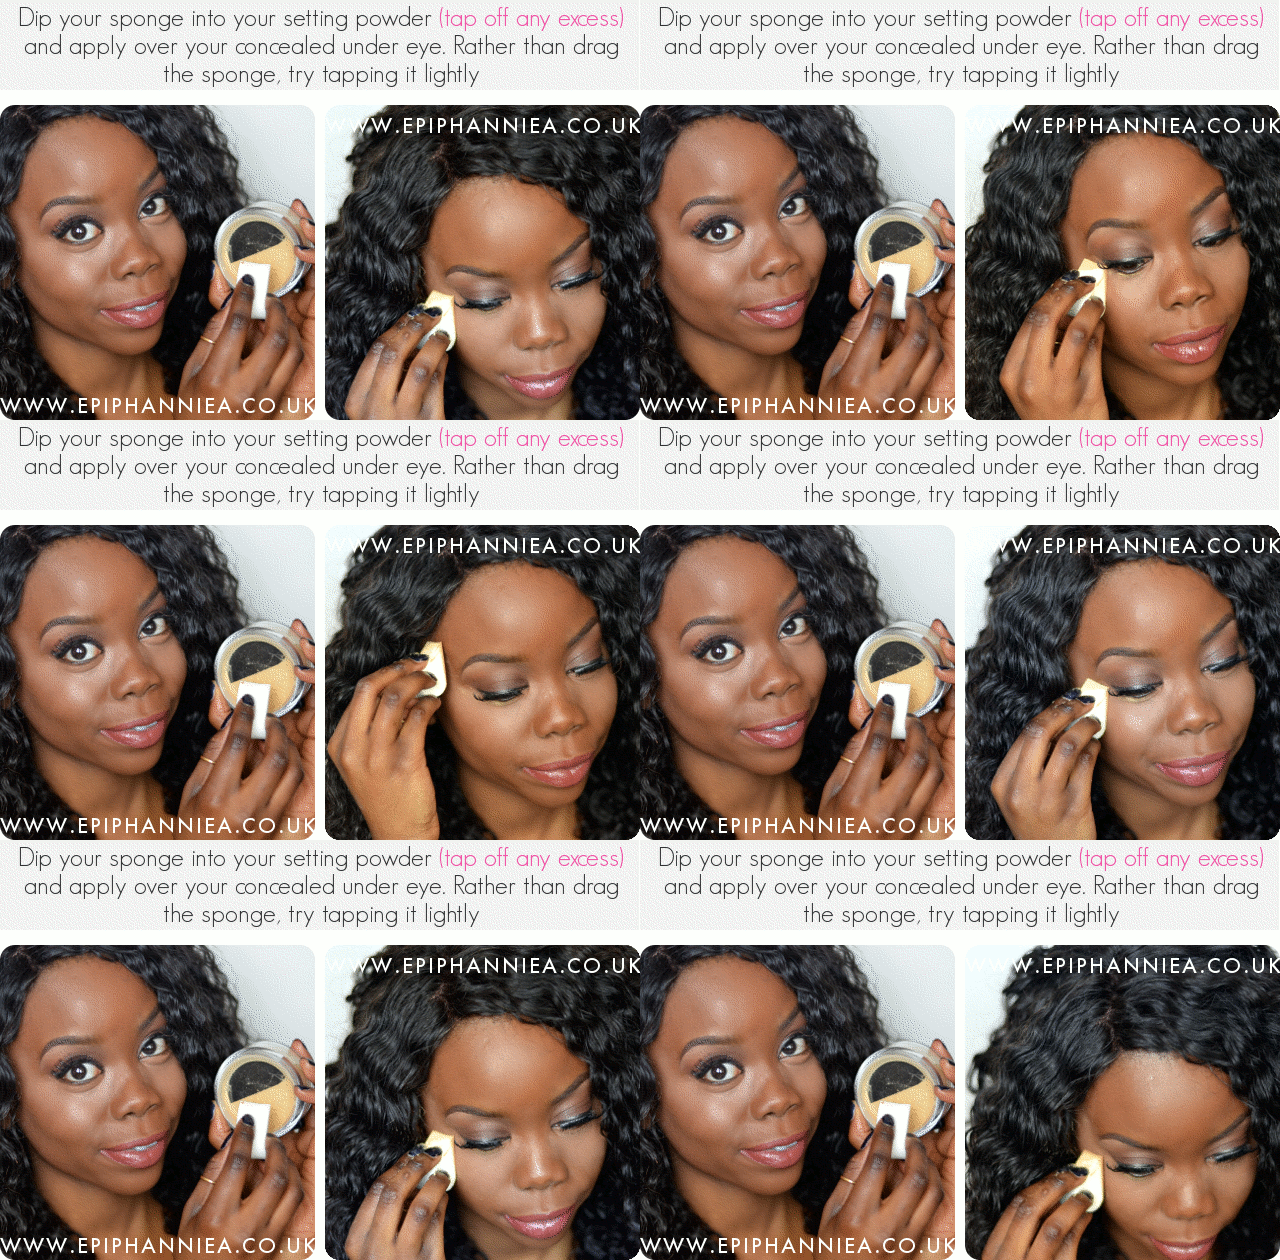
 photo set_undereye_concealer_mac_select_cover_up_concealer_daniel_sandler_on_the_loose_powder_real_Technique_brushes_black_girl_da_zps6c42bbaa.gif photo set_undereye_concealer_mac_select_cover_up_concealer_daniel_sandler_on_the_loose_powder_real_Technique_brushes_black_girl_da_zps59aaf5b6.gif


Tools

  • Daniel Sandler On The Loose Powder in No.10
  • Select Coverup Concealer in NW40
  • Real Techniques Pointed Foundation Brush
  • Cosmopolitan Makeup Sponge

I hope you like this tutorial and as always let me know if there is anything you want me to do a tutorial on, I promise I don't bite.


Also, you may have already noticed, but it is that time of the year again.... It is the Cosmopolitan Blog Awards!  This is my first time of signing up for these awards so I would be REALLY, REALLY grateful if you could take five minutes to nominate Epiphannie A in the Established Beauty Blog category. I have been loving sharing my zany self all over the beauty blogosphere for the past two years and it would mean the world to me to be nominated for this at least once
Thank you in advance!
continue reading "How To:- Set Undereye Concealer"

Monday, 13 May 2013

Review:- MAC Ririwoo | Riri Loves MAC Collection

I am a bit of a lipstick-holic so there was no way in lipstick heaven and hell that I wasn't going to grab myself a bit of Ririwoo.

As you already know (As this lipstick was hyped beyond belief) Ririwoo is an early release from the Riri Loves Mac Collection fronted by Rihanna, but in the standard MAC black bullet. You don't really notice the difference between this shade and the other MAC lispticks until you begin to unscrew the lipstick to reveal the "Riri" signature.
MAC Ririwoo is based on the cult RubyWoo but was meant to be a blue-tones, creamier and slightly darker version. If the Instagram pictures are to be believed, there is not much of a colour difference between Ririwoo and Rubywoo.

 I am normally very good at picking up the subtle differences between similar shades but even I have to admit I can't tell much of a difference, which is slightly annoying considered I nearly gave myself an ulcer over this MAC shade.
Never in my lifetime have I ever stressed out so much for a lipstick. 10 alarms were set on my office MAC and my iphone just so I could be on the MAC UK website at 10.59am on the dot (but let's be honest I couldn't exactly sit back and let Rihanna's first MAC lipstick go unnoticed). Obviously the rush to get the Ririwoo lipstick in the UK was nothing like the States but I wanted to buy about 8 lipsticks (not all for my personal uses obviously) so I really needed to be quite nimble.

I really love this shade as it does seem to work on every skintone but I really don't love how Matte it is. It has that sandpaper feel that has stopped me from buying Rubywoo but it does seem to have a great wear time. It has already survived 3hours and one cup of tea but I'll let you know .


Also, you may have already noticed, but it is that time of the year again.... It is the Cosmopolitan Blog Awards!  This is my first time of signing up for these awards so I would be REALLY, REALLY grateful if you could take five minutes to nominate Epiphannie A in the Established Beauty Blog category. I have been loving sharing my zany self all over the beauty blogosphere for the past two years and it would mean the world to me to be nominated for this at least once

Thank you in advance!
continue reading "Review:- MAC Ririwoo | Riri Loves MAC Collection"

Tuesday, 9 April 2013

Brushes For Foundation

Which Brush to use for Foundations, Brushes for foundation
Now these are MY favourite brushes to use to apply my foundations.  I’m not telling you to go out and buy every single one of these brushes as I doubt you will ever need them all. I’m just a hoarder and like to be prepared for anything and everything (at least that’s what I tell myself). This post is just carrying on from this week's focus on makeup products for the face and it is really just meant to act as a guideline on what certain brushes are for and the brands I buy them from.
These 6 brushes are my favourites to use on my face. I have put a bit of a variety here so we have brushes that can be used with on cream, powder and liquid foundations. Some of these brushes are multi-purpose so can be used for different types of foundations but I’ve grouped these brushes by what I use them for.

Liquid Foundation - Layering

I love Japonesque Slanted Foundation Brush which is an angled, flat brush because it minimizes my pores and skin imperfection. I normally use this brush when I am suffering for a slight skin reaction from a product I am testing (which nowadays tends to be every other week or so).or when I have chosen to conceal/correct an imperfection on my face and I want to layer on my foundation rather than buff it out. I personally believe that flat foundation brushes are the best brushes for covering the skin's imperfections and working with heavy coverage foundations.

Liquid Foundation  - Buffing

MAC Cosmetics 187 Duo-Fibre Stippling Brush is the perfect brush for a dewy finish and is probably the most used brush. I use it predominately for liquid but will use it to buff on a thin layer of powder. I actually own two of these brushes in the off chance I lose one. I do find that the MAc 187 brush is very foundation dependent. It works amazingly well with some foundations but can leave annoying streaks with another.

Real Techniques Expert Face Brush is actually my newest brush discovery and I really wonder what has taken me so long to get this. The broad head of this brush is amazing for both liquid and cream application. At only £9.99 I can't believe how amazing this brush is for it's price bracket.


Powder Foundation

I normally use powders to set my foundation and a light sweep over my foundation with Japonesque Powder Brush is often enough to keep everything from slipping during the course of the day. Japonesque but I have also used Real Techniques Buffing Brush from their Core Collection if I want more control over where I place my powder.

Cream Foundation - Layering

If you use a cream foundation, you have the option of using a flat-ended brush to blend in your foundation with but I find that these brushes can be a bit bulky and don’t quite get into corners like the sides of your nose. I use Becca Cosmetics 58 Foundation/Concealer Brush which is has a pointed tip with tapered 3-tone synthetic Taklon fibres. While it does take a bit longer to use compared to a flat-ended brush, I love the smooth, sheer application this gives me.

How I ended up using 6 brushes on my face; in rotation, I will never know but these are my favourite brushes to use and if you ever wanted to know what brushes I am using in my past or future tutorials or FOTDs then consider yourself informed.


continue reading "Brushes For Foundation"

Wednesday, 6 March 2013

The One About MAC Haul The Week Before The Flight

I must be the only person in existence who decides to go shopping in MAC the week before an international flight, honestly WHO DOES THAT???

MAC Cosmetics is actually cheaper in the states (and FYI I'm actually in the states right now) but my “I want it NOW nature defied my rationality and I had to make a stop to the MAC store the minute my payslip hit my bank account.

I would like to say first off that I am aware I’m on a spending ban (although cheating on it) so I didn’t go as crazy as I normally do. I steered clear of the lipsticks and bought items, which I felt were essential to my daily beauty routine.

As I don’t have any major makeup problems, I actually don’t wear any foundation, blush, contour, concealer etc. during the week, preferring to rock a lipstick/gloss with groomed brows. My eyebrows are a non-negotiable part of my beauty routine. I could swear off wearing any makeup for months on end but if my eyebrows aren’t allowed to come along for the journey . . . there will be a show of aggressive behaviour. *I’m just saying*
I decided to get MAC Fluidline in Dipdown as an alternative to my eyebrow pencil as I need travel appropriate brows that won’t need touching during the day and won’t mysteriously vanish after a nap on my flight. Dipdown is a warm brown matte gel liner that will suit anyone with brunette or dark hair as it will match your natural brow shade without making it look too dark. It is almost impossible to get dipdown on the UK MAC Website so a trip to your local counter might be in store (unless you have Lady Luck and some lucky charms on your side that is)
I normally use my Eco Tools Bamboo Angled Liner brush for gel-liner brows and while this does the job very well, I find that I don’t have as much control as I normally have with my MAC brow liner so I decided to get the MAC 208 Angled Brow Brush which is almost half the size of the Eco Tools brush which I hope will mean that I have more control and precision when doing my brows.
Last is some new concealer. I normally use NW45 or NW40 in MAC Studio Finish Concealer but I wanted to go for something in the middle that would be a little more subtle than NW40 as it can look very “striking” and I find that I normally have to wear foundation just add some subtleness.  I got NC50 which is literally half a shade lighter than my skintone and as this is still a new shade for me, I can’t really let you know right now if it was the right colour choice for me but give me about two weeks and I might just do a comparison post between the 3 shades.

I actually am still kicking myself that I bought MAC products whenI was so close to going stateside but in all fairness I want to explore cosmetics that I can’t really get easier in the UK, I wonder if I will even bother going to the MAC store in the end.
continue reading "The One About MAC Haul The Week Before The Flight"

Thursday, 28 February 2013